Tuesday, March 25, 2014

How to tune your drum set?

A drum set can never be tuned right or wrong. There is no such specific tuning standard for drums. If you ask 10 different drummers you will get 10 different answers. I personally have tried a number of techniques for tuning of drum set and found this one to be easy yet effective. The following technique is used to tune your toms and base. Tuning of snare would be uploaded further.

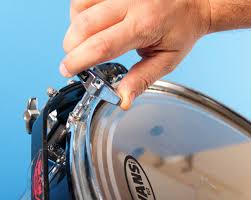
1.  Loosen the tension rods of drum heads one by one evenly. Use a drum key always while loosening the rods. You always get a drum key that matches with the bolts of your drum head. So do keep in mind never loose your drum key. Do loosen the bolts by turning the key half a circle each time one by one. And once it is completely loosen  the tension rods one by one.

2. After removing the tension rods remove the drum head and resonant head. After removing clean the inner part of the drum with a clean dry cloth. Even wipe the drum head to clean it and make sure there are no cracks in it. Even if you are replacing the old drum head with new one wipe it as well.

3. After cleaning put back the drum head and tension rods. Tighten the tension rods with your hands(without using the drum key) and keep going until all the tension rods are finger tight.

4.  After finger tightening the drum head push the middle part of drum set with your fist. Push it as hard as possible. Don't worry you will not tear the drum head. It is capable to bear the load of your fist and then re- tighten the tension rods with finger.

5. Now is the important part of tuning the drums which involves a lot of concentration. Rotate the tension rods half a circle one by one on each tension rod till you get the desired sound for your drum.

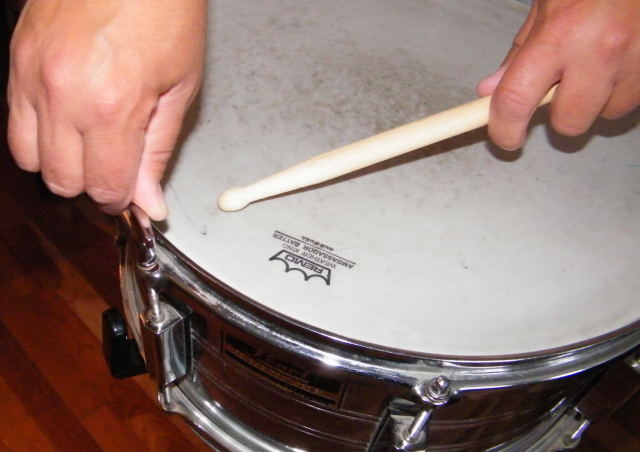
6. Now fine tune the drum by tapping about an inch away from the tension rod and listening whether all the tension rods are tuned evenly. There should be same sound near every tension rod. You can even use a digital tuner for this. Many tuner apps are available on smartphones.

7. Best advice is to tune the resonant head i.e the bottom part of your drum set first because the batter head wouldn't sound right until you pitch the resonant heads nicely.

Saturday, March 22, 2014

How to make guitar chord changes smooth


 Guitar chord changes is one of the important thing for playing guitar perfectly. First I will tell about how usually we change chords.
1.  We play the first chord 
2. Lift all our four fingers of left hand  together(or right hand fingers if you play the guitar either way)
3. Place the fingers on the strings of the second chord as the right hand fingers pluck the string.
Playing in this way will result in disconnected sound. Because all fingers are lifted together and then for a fraction of second there is no sound. This fraction produces the undesirable disconnected sound.


The correct way to change the chord is that while changing the chords you always start with the finger that is far away.
For Eg:  If you are moving from F chord to G chord in open position then your pinky finger moves from 4th string to 1st string.
Here start by moving the pinky finger first keeping all other fingers in position. Due to reflex action of our fingers what will happen is eventually our other fingers may even slide to their respective strings and frets provided you know all the chords well. In this way there will be no discontinuity.

Some more tips:
1. Keep your fingers close to the fret board as possible because when your pinky and third finger starts flying in air it takes time for them to come back on the frets.


2. Stay relaxed and let your natural moment of hand help you get the chord because atllast guitar is designed according to your hand and finger movements.
3. Keep your right hand moving.  The way your brain works  has a lot to do with how your hands react.  As a beginner,  your brain is giving you permission to stop in between chords and rationalizes it as “we’ll get it eventually.”  It’s normal and happens on a subconscious level.  You can easily change that by setting up a dissonance in your  brain. That means presenting your brain with a problem it needs to fix.  Here’s the way it works:  You brain loves when your hands are moving together.  So if you force your right hand to keep strumming, no matter what happens in your left, your brain will want to solve that dissonance by making your left hand move faster to keep up with your right.  Exactly what we’re looking for.

Keep Guitaring and Follow "THE MUSIC COMPANY".


Friday, March 21, 2014

Upgrading of Blog

We are very delighted to announce that due to the massive response of our customers from all over the world  we are starting video tutorials even. They will be uploaded in English language and will have french subtitles even due to huge response from France. 

Tuesday, March 18, 2014

How to improve your guitaring technique and play guitar clean.

This article will help you to play your guitar clean and reduce all the unwanted string noises. Do try to use an electric guitar if possible while practicing as electric guitar will produce noise for even the slightest of string movement. If you do not have an electric guitar then even acoustic guitar will do.


1. Focus 

      Focus is the most important thing that you need to perfect your guitaring. Most of the guitarist know that something is wrong while they are playing but cannot tell exactly where they are making a mistake. The best solution for this is focus. Focus on your fingers or plectrum movements and simultaneously on what you hear. If this is not effective then try to record your songs 2 - 3 times and see what is the difference between all the tracks for whether you hear any unwanted sounds. Then try to correct that portion. Another way of doing this is to have someone with you who knows guitar or has some knowledge about guitar. Let him stand in front of you and tell you your mistakes. Try these things and you will surely improve.

2. Playing guitar fast yet clean

              After you have learnt to focus take some crazy guitar solo of  your favorite song that you like but never could play it that fast.
Now try practicing that solo but now in some other way.

1. Use a metronome(If you do not have a metronome then there are lots of apps available online)

2. After you get metronome set it at 70 bpm 

3. Now try playing the solo in sync with the metronome
  (The key for this is slow playing until you get each and every not correct and that sounds right)

4. After you get perfect at 70 bpm increase the speed by 10 bpm and practice at this speed

5. Now go on increasing it likely till you get to the original speed of that lead. After playing for a while you will also realize that you can play even faster than the original tempo and that to each note sounding correctly.

Note:

Patience is very important while practicing this technique you will take almost a month or more to get perfect and clean. 

You need to practice this daily for at least 2 hours.


Monday, March 17, 2014

How to improve your drumming speed?

1. Learn how to handle the sticks first.

    Pay attention to how you hold the sticks. It is really important as your motion changes by the way which you hold the sticks. Catch the drum sticks near the butt end of the sticks, fore fingers on the bottom, thumb on top and thumb nails facing on the other side. There should always be some space between your palm and stick. Do not hold the stick too tight there should be a free movement of your wrist while playing the drums. While playing keep your hand steady and just move your wrist to control the sound.  

2. Use a practice pad 

             Always use a practice pad to practice. If you don't have a practice pad u can keep a notebook or something like that on your throne a practice on that with your drum sticks. Here are some simple exercises that you can practice on the practice pad. Start from the first pattern and then go on till you get perfect in each.
Now how will you know that you have got perfect. To measure perfection use a metronome. You can get a metronome app for this available on any smart phone. 
L= left hand
R= right hand

1.        LR  LR  LR  LR
2.        LRLL  RLRR  LRLL  RLRR
3.        LL  RR  LL  RR
4.        LLR  LLR  LLR  LLR

Do it in sync with the metronome from  70 bpm  to 180 bpm 


3. Practice daily

               Devote atleast 3 hours everyday for practice. Divide your practice session such that you will practice one pattern for a specific time

Saturday, March 15, 2014

How to take care of your drum set

Maintaining a drum set is a simple thing, assuming you do it regularly. Proper 

maintenance will keep it looking new and sounding great. Here are some 

simple DRUM SET MAINTAINING TIPS that you could use to make your drum 

set not only look but even sound better.


1. Where should we keep our drum set?


              The drum should not be kept in contact of direct heat as this could 

dry and crack the wood. Don't store it near a heater, in sunlight, or in the car 


(or boot). It is best to store it in a case or a cupboard when the weather gets 

hot; in very dry places you could leave a damp cloth with the drum to aid 

humidity. As the drum gets hotter, the skin tightens and can split or pull 

away from the pins holding it in place. While travelling even if you are taking 

it in your car then do turn on your car air conditioner. And avoid keeping 

cymbals, stands or any sharp drum set component near to drum heads while 

travelling as eventually it may come in contact and damage the drum heads.


2. How to take care of drum heads?


              Always de-tune your drums i.e loosen the tuning bolts when you 

are not using your drum set or travelling, especially in more humid conditions. 

This preserves the life of the drum heads and helps maintain their elasticity. 

Drum heads need to be replaced periodically; both top i.e the batter head 

and bottom i.e the resonant head. One sign that tells you need a drum head 

replacement is that your drum set starts to loose that resonating sound and 

its sound decreases .


3. How to clean cymbals?


            Cymbal cleaning is one of the most time consuming part of cleaning 

the drum set. If you do not clean the cymbals it may have a grimy layer on it 

which will in turn corrode the metal. To clean the cymbal all what you need is 

a glass cleaner spray, a cymbal polish, a car wax, a clean cloth and a 

toothbrush even an old toothbrush can be used. First spray the glass cleaner( 

Soapy water may also do the work) and then brush the cymbals with tooth 

brush after that  clean the cymbals with clean water and then wipe it clean 

and dry. Then apply a cymbal polish, even 2-3 applications may be needed if 

your cymbal is in a really bad state. After this apply a wax polish to make it 

shine.

Note: Wax polish should not be used for PAISTE cymbals as they are coated 

with a special finish and they do not need it particularly.

3. Clean of the chrome parts         

   Chrome is found all over the drum set; tom mounts, lugs, stands, and rims 

are usually chrome plated. Chrome can be ruined by moisture so keeping 

your equipment dry is important. You should wipe down the chrome on your 

kit with a fluffy terry-cloth towel once a week, minimum.


.

Wednesday, March 12, 2014

Buying a guitar

We all want a guitar that looks great to us. But when you are buying a guitar there is allot more to look for in the guitar you are buying then just how it looks. Sadly enough allot of sales people will try to make a sale on a guitar just because the way it looks. Yes, look is one of the factors for selection of guitar but there are a lot more things that you should know while purchasing guitars. Because if you know what to look for the sales person in the shop will see that you know what you are talking about and they might also start to make you better deals on guitars or even other equipment for that matter and this could save you some money even.

These are the things you should decide before buying a guitar:

1. BUDGET:

                  Fix your budget at first because it is one of the most important factor while purchasing a guitar. The build quality and even the sound quality of a guitar increases with its price. So think about the price before buying a guitar. Ideally if you are a beginner then your budget should be around Rs.5000 - Rs.10000. (Or around 200-300$ ) It is advised to keep your budget low if you are a beginner.


2. ACOUSTIC OR ELECTRIC:

                   Decide if you want to play an acoustic or electric guitar. Though both are guitars but there is a difference in their functionalities. An acoustic guitar has a  hollow body and produces an acoustic sound i.e the classic guitar sound which you see in unplugged songs. An electric is a guitar that uses a pickup to convert the vibration of its strings into electrical impulses. You need a loudspeaker always if you want to play this guitar as its original sound is too low. We can also add effects to the electric guitar sound like reverb or distortion provided you have an additional amplifier. Thus in short you need a loudspeaker and an amplifier to play this guitar which adds to your budget. There are also Acoustic Guitars available with a port for sound output i.e you can connect it to a loudspeaker which are called as Semi- Electric Guitars as well and that's also a good option.


After deciding the budget and the type of guitar lets have a look at some technical things u should have a look while purchasing guitars

1. Checkout the neck of the guitar. See if you can comfortably play along its neck. There are actually various types of guitar necks and you should choose which is suitable for you

2.  Look down the side of the neck at the string to make sure you see no warps or that the strings kind run off to one side or the other. They should look all in line perfectly from side to side with perfect spacing.


3. Also look at string height from the neck. You don't want the string to be so high off the neck they are hard to push down. It should feel like butter on a electric guitar and even on most acoustics now and days that are decent.

NOTE: Acoustic is always a little harder the electric guitars.

4.  Look around the neck area where the neck meets the body of the guitar. This is a mistake many people do not look for. Even in new guitars this can happen. If there are any hairline cracks in the paint there is more then likely a crack in the body and this can be very bad. Never ever buy this guitars!!!

5. Check all the knobs on the guitar if it is electric by turning them up and down and listening for crinkling sounds or sounds of noise while doing it. If there is, then these pots need changed before you even buy it. This is a minor thing really because they do go bad over time with dust getting in them. They are not too expensive depending on what type you want to replace them with that is? There are some more expensive types.

SO THESE ARE THE SMALL BUT REALLY IMPORTANT THINGS WHILE PURCHASING GUITARS .
IF YOU ARE PLANNING TO BUY ONE THEN PLEASE DO LOOK AT THESE THINGS. IF YOU HAVE ANY MORE QUERIES REGARDING BUYING A GUITAR. PLEASE DO COMMENT!!!

For more such information please do follow 
THE MUSIC COMPANY